The Holiday Light Controller is a fun project that lets you provide public access to your outdoor lights during the holiday season. Perfect for homeowners, parties, café, restaurants, and church displays to let admiring visitors select a number of lighting transitions such as Wave, Psychedelic, Sequence On/Off, and Overlapping commands via a mobile phone.
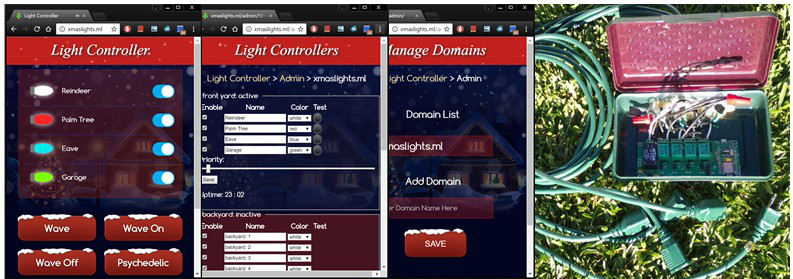
The Light Controller lets visitors and neighbors securely control your outdoor lights from their mobile phone by navigating to a URL provided by you. No phone app installation necessary.
In addition to providing optional public access to your lights, the Light Controller also works as a timer and turns the lights on and off at the time configured by you. Lights turned on or off by visitors automatically revert back to their configured default state after some time.
This DIY tutorial shows how to connect one or several relay/triack WiFi modules to an online server and how to enable visitors to control the relay/triack WiFi modules via a web interface provided by the online server.
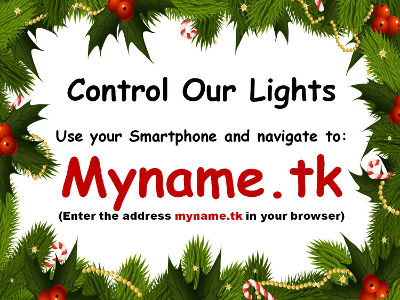 |
The server solution requires that you use at least one domain name. You can sign up for free domain names using, for example, freenom. A suggestion is to select a name such as your last name or your street address. You could then create a sign and display this sign on your front yard. Download the Powerpoint representation of the image to the left by clicking on the image. |
Before starting on the DIY Light Controller project, download and run the Light Controller Simulator. The simulator can also be used to run a local Light Controller server solution on your own private network instead of installing the Light Controller app and the server on an online VPS.
The Light Controller Simulator is designed to give you an introduction to the Light Controller's web interface.Download SimulatorLight Controller Simulator Note that the simulator starts as soon as you have unpacked the files in the self extracting Light Simulator zip file (exe). See the video to the left for details. |
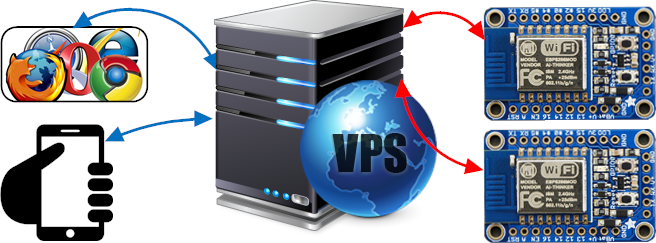
The Light Controller solution works best if installed on an online VPS, however, you can also install the server on your own personal computer or any supported device connected to your local network.
The benefit of installing the Light Controller solution on an online VPS is that it enables easy public access to the Light Controller's public user interface. Any person can use their mobile phone and control the lights without requiring access to your local network. If the server is running on your local network, only users with access to your private network can control the lights.
An online server is needed for hosting the server side Light Controller software if you want to provide public access to your lights. You can either use a standard Virtual Private Server or use a free cloud server (test account) provided by providers such as Microsoft Azure and Google Cloud.
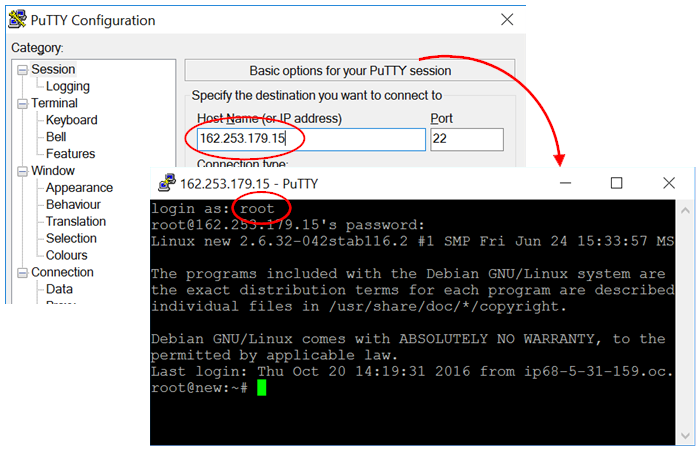
An online VPS enables you to remotely login by using SSH (Secure Shell). If your own computer is running Windows, download the SSH client Putty, and start the executable from any directory. Mac and Windows computers typically include a command line SSH client, thus you can simply type ssh in a command line on Linux and Mac.
When you sign up for a VPS service, such as the budget securedragon VPS (O64), you will receive an email with instructions on how to remotely log into your VPS by using SSH. The instructions include the IP address of your new VPS and the root (admin) password. The following figure shows how to enter the IP address in Putty and how to login as user root in the command line window.
To install the complete Light Controller Server Software, copy all of the following and paste the commands into the SSH console window.
The above script will ask you to enter a name for an administrator and the password. When the server is installed, the administrator credentials will enable you to log into the web based administrator user interface. Use your browser and navigate to the IP address of the online VPS as soon as the installation script completes. You will then see the Light Controller user interface.
The above script automates the installation, but you can also install the server manually.
The Google Cloud Platform provides free services for low capacity web applications. The DZone article Dockerizing Your Homemade IoT Christmas Light Controller explains how to use a (free) alternative to using a VPS.
The Light Controller consists of the following: the Mako Server and the Light Controller App (zip file). You can run the Light Controller on any platform supported by the Mako Server such as the Raspberry Pi, Windows, Mac, and Android. Run the Light Controller on any supported platform by following these steps:
You have several options when connecting Light Controller banks (the actual devices) to the Light Controller Server running on your private network.

As an option to running the Light Controller server solution on an online VPS, create a separate and open (no password) Wi-Fi network for the server solution and the relay boards. Neighbors and visitors can then connect to the open Wi-Fi network using their mobile phone. This solution requires neighbors with a deeper technical knowledge since they first need to connect to the open Wi-Fi network and then navigate to the server's IP address by using a browser. Note that some Android phones refuse to stay connected to Wi-Fi networks with no internet access. The phone connects, discovers that this is an intranet with no internet access, and then disconnects.
A low cost Linkit Smart or Onion Omega2 can be used as an open access point and you can install the server solution directly on the access point. See the installation tutorial for Linkit Smart and Onion Omega2 for details. The tutorial includes instructions for how to install the Light Controller server solution.
The device firmware is designed for the ESP8266 and the ESP8285 Wi-Fi chips and, in particular, for ready to use ESP8266/ESP8285 relay boards. You can use any Arduino ESP8266 board, but that will require modifications for the GPIO settings in the firmware source code. The benefit in using a relay board is that it comes ready to use with relays and a power supply. Other ESP8266 boards may require that you also assemble your own I/O hardware and relay banks.
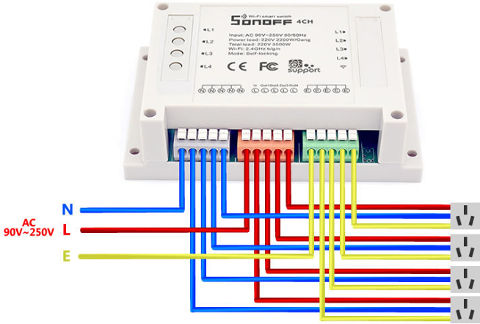
Sonoff 4CH is one of the supported ready to use ESP8285 Arduino relay boards
Download the Light Controller Device Software, unpack the ZIP file, read the README file, and open the Sketch in the Arduino IDE. Compile the code as instructed by the README file and upload the code to the ESP8266 board.
If you are new to the Arduino IDE and to the ESP8266 Arduino IDE plugin, follow one of the getting started guides such as this one or watch an ESP8266 video on YouTube.
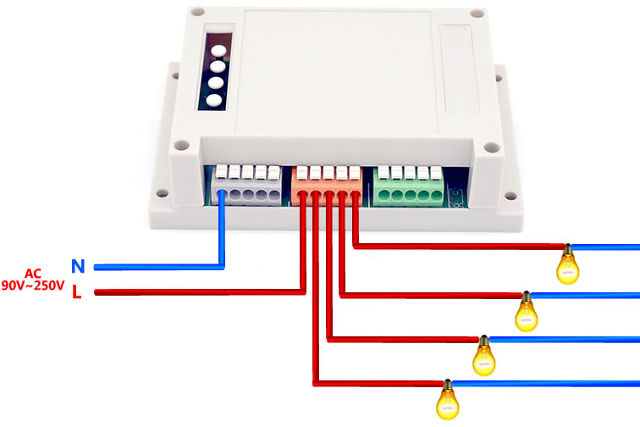
Note that one ESP8266 is referred to as a light bank, and the ESP8266 WiFi Four Relay board provides a bank of four lights. You can connect any number of light banks to the online server. The server will then merge the light banks into one coherent user interface, enabling you to control any number of lights.
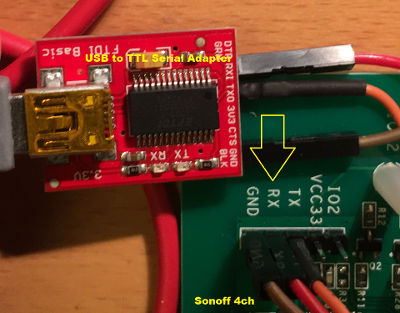
The figure to the right shows the USB to serial adapter and the three serial cables (TX, RX, and GND) wired to the Sonoff 4CH.
The Manual, which explains how to use the online web interface and how to initially configure the ESP8266 using a browser, can be downloaded as a PDF: LightControllerManual.pdf. The manual is also integrated into the online web interface and can be accessed after installing the Light Controller server solution.

In addition to the Arduino device source code available above, we provide full source code for the server application and the web application. The complete server/web code is packaged as a deployed Mako Server application (ZIP file), and you may download this app separately by downloading LightController.zip. You can unpack and study the code or use the integrated source code viewer that explains how the code works. You can study the source code on your own computer by starting the Light Controller App using the Mako Server as follows:
mako -l::LightController.zip. Click the RTL icon in the bottom left corner of the web interface to get to the source code viewer.
The following section is for computer programmers:
The Light Controller Application is designed for the Mako Server and uses the SMQ protocol for real time communication between browsers, the Light Controller Server App, and devices (Light Controller banks).
The web based Light Controller App is powered by JavaScript and enables the user of the web interface to control the lights in real time by sending one-to-one and pub/sub SMQ messages to the light controller devices via the online server.
A problem with many pub/sub protocols is that they typically cannot be used without authentication since this would leave the door completely open, especially for pub/sub protocols that enable wildcard subscription. See MQTT was hacked to pieces by Lucas Lundgren and we also hacked MQTT to pieces.
However, the web-based Light Controller App would not be very user-friendly if visitors were forced to register and login prior to being able to control the lights. We wanted the app to be user friendly; thus the Light Controller solution was designed to not enforce authentication for the SMQ protocol.
You are probably at this point thinking, hey wait minute, the Light Controller App must be totally insecure. However, that is not the case, since the SMQ protocol enables us to enforce strict authorization.
The light controller security concept was inspired by the article Have We Forgotten the Ancient Lessons About Building Defense Systems. Based on this article, the Light Controller server solution is designed to: (1) work in stealth mode, and (2) enforce strict authorization. Authentication would have added one additional line of defense, however, we wanted the solution to be user friendly and the solution is designed to be sufficiently secure without having to use authentication.
Hackers first need to identify a solution before they can attempt to exploit it. The ESP8266 light controller devices operate as network clients (TCP/IP clients), thus they cannot be identified nor can they be directly compromised. Although the SMQ brokers operate as servers and can be detected, it is unlikely since an automated port scanner cannot easily see the difference between a web server and the SMQ broker. In addition, the SMQ broker cannot be found by going directly to the IP address of the server. The broker can only be found by using one of the registered domain names.
Should a hacker still find the broker, the second line of defense kicks in. The Light Controller Server App is designed to enforce strict authorization, where an attacker will be identified and temporarily banned. The exact authorization logic implemented for the Light Controller Server App is best understood by studying the Lua source code.
For more information on the server source code, navigate to our online demo server using the links below. Read the introduction and study the source code by using the online source code viewer. You may also download, unpack, and study the server source code.